Admin Guide
Email Notifications
The app offers email notifications to improve your workflow efficiency. To activate these features, you need to configure Power Automate flow. Setting up a flow for email notifications ensures that users are informed about specific events, such as receiving a new request for approval. Email templates can be customized in Administration → Timesheet Templates → Edit → Email Notifications tab.
Configuring Power Automate flow for email notifications
Step 1) Power Automate Email “From” Address Setup
If you click Create Power Automate Flow while signed in with your personal Microsoft 365 account, that account will be used to run the flow and will appear in the From field of outgoing emails. This setup is sufficient for testing or trial purposes, and in this case you can skip the production options below and proceed directly to Step 2.
For production environments, there are two recommended options to ensure a proper From address
(for example, noreply@yourdomain.com):
Option 1
Before clicking Create Power Automate Flow in the app, create a dedicated Microsoft 365 service
account (for example, noreply@yourdomain.com) and open the app while signed in with this account.
The flow will then run under this service account.
Detailed step-by-step instructions for this option are described in the corresponding guide.
Option 2
Create the flow using your own Microsoft 365 account, and after the flow is created, set up a shared mailbox
(for example, noreply@yourdomain.com). Then update the flow to send emails from the shared mailbox.
This option does not require an additional license, as shared mailboxes up to 50 GB are free.
Detailed step-by-step instructions for this option are described in the corresponding guide.
Configuring email notifications is done by clicking the link in the app (view Administration → Settings → tab "Email Notifications&Reminders" in the ap) that creates a Power Automate flow template. After the flow is created, you only need adjust the template.
 Below is an video that guides you through the entire process of configuring the Power Automate flow for email notifications (click the 'play' icon to start watching).
The basic setup is simple and takes less than a minute to complete.
Below is an video that guides you through the entire process of configuring the Power Automate flow for email notifications (click the 'play' icon to start watching).
The basic setup is simple and takes less than a minute to complete.
Below are detailed steps to configure Power Automate flow
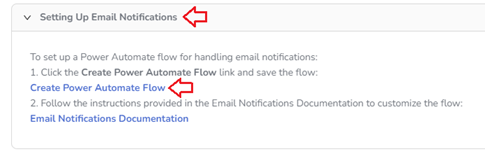
- Open view Administration → Settings → tab "Email Notifications&Reminders" in the app
- Expand tab "Setting Up Email Notifications" and click on the link 'Create Power Automate Flow', that will redirect to the Power Automate flow creation page.
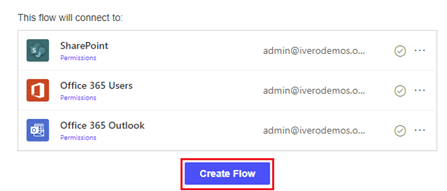
- Click the 'Create Flow' button.
- Click button "Edit" to edit the flow
- Optionally change flow title
- Click on the component "Send Email"
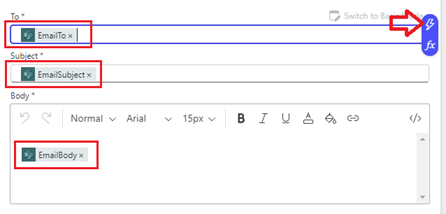
- Remove all existing values from fields "To", "Subject" and "Body"
- Use the 'thunder' icon to enter variables:
Field 'To': select 'EmailTo'
Field 'Subject': select 'EmailSubject'
Field 'Body: select 'EmailBody'
- Click button "Save"
- Click button "Save" to save the flow

- Now you can test the flow by creating and submitting requests in the app and check if email notification is delivered.
Message delivery time may vary slightly, i.e. sometimes Power Automate delivers messages immediately, and sometimes it takes even a few minutes.