Admin Guide
General Settings
The General Settings section allows app administrators to configure foundational settings to align the app with organizational preferences. Customize options such as client tracking, timesheet templates, task management, billing rates, public holidays, working days and hours, date and time formats, default currency, user roles, and custom fields for users, projects, and clients to ensure the app meets your operational and regional requirements.
Navigating General Settings
Steps to adjust general settings
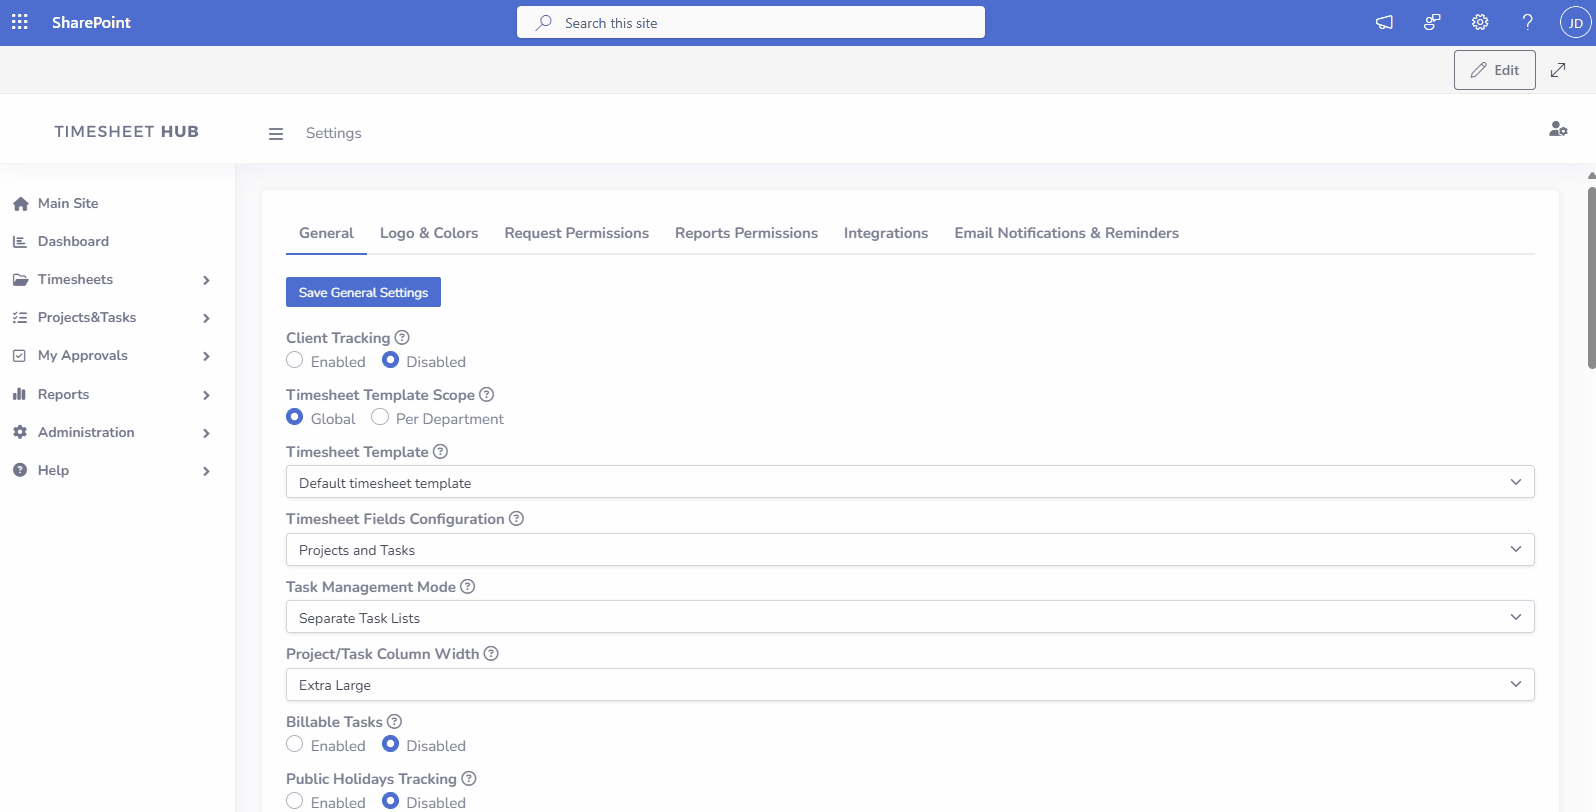
- Open view Administration->Settings in the left menu.
- Adjust settings to your needs
- Click button "Save General Settings" to confirm
Notices
- Don't forget to click button "Save General Settings" to confirm changes, otherwise changes are lost
- For more details about specific settings, hover your mouse over the help icon next to each option to display a tooltip with additional information
List Of General Settings
| Setting | Description |
|---|---|
| Client Tracking | When enabled, administrators can define a list of clients (customers) under Administration → Clients and assign them to specific projects. This allows reports to display total hours and billing amounts grouped by client for more detailed tracking and analysis. |
| Timesheet Template Scope | Defines whether a single global timesheet template is used across the organization or different templates are assigned per department. Global: One universal template for all users (configured in the Timesheet Template setting below). Per Department: Assign different templates to departments under Administration → Departments (e.g., HR uses a weekly template, IT uses a monthly one). |
| Global Timesheet Template | When 'Global' scope is selected, choose the single timesheet template applied to all users. |
| Timesheet Fields Configuration | Choose fields displayed in the timesheet. 'Clients, Projects, and Tasks' for full details; 'Projects and Tasks' to skip clients; 'Tasks Only' for tasks without projects/clients (forces 'Separate Task Lists' mode). |
| Task Management Mode | Choose how users select/enter tasks in timesheets. Tasks Linked To Projects: Define tasks (and optional subtasks) within each project; users can only pick from that project’s list. Separate Tasks Lists: Maintain a central catalog under Projects & Tasks → Task Definitions. Free Text Entry: Users type any task name into a textbox—fast for ad-hoc work. |
| Billable Tasks | When enabled, tasks can be marked as billable, allowing billing rates and amounts to be tracked in timesheets and reports. |
| Billing Amount Tracking | When enabled, the billing amount is calculated and displayed in the timesheet based on the hours entered and the assigned billing rate. |
| Billing Rate Assignment Modes | Choose how billing rates are assigned. 'Per User' assigns rates to users; 'Per Task' assigns rates to tasks; 'Per Project' assigns rates to projects; 'Per Client' assigns rates to clients. Multiple modes can be selected. |
| Public Holidays Tracking | When enabled, administrators can define public holidays under Administration → Public Holidays, which appear in the timesheet and can optionally block timesheet entries on those days. |
| Block Timesheet Entries on Public Holidays | When enabled, users cannot enter time on public holidays in the timesheet. |
| Public Holidays Mode | Choose how public holidays are applied across users: a single global calendar or separate calendars based on office location. |
| Project/Task Column Width in Timesheet | Set the width of the Project/Task column in the timesheet for better readability. Default is 300 pixels. |
| Force Operations | When enabled, administrators can force approve or reject requests, overriding the regular approval process. |
| Integration List | Enable or disable export (Administation → Settings → tab "Integrations") for integration with other systems like Power BI or Power Automate. |
| First Day of Week | Set the first day of the week for calendars and date pickers. |
| Working Days and Hours | Defines the standard working schedule for your organization. This setting is used to hide non-working days on timesheet forms and to automatically calculate overtime when overtime tracking is enabled in the timesheet template. |
| Date Format | Choose the format for displaying dates throughout the app. |
| Time Format | Select between a 24-hour or 12-hour time format. |
| Decimal Format | Choose how decimal numbers are displayed (e.g., 1.234 or 1,234). |
| Allowed Hours Precision | Set the precision for time entries in timesheets (e.g., 0.25 for quarter-hour increments). |
| Default Currency | Set the default currency for billing amounts. |
| Default View for Managers | Set the default view after opening the app for users with the Manager role. |
| Default View for Project Managers | Set the default view after opening the app for users with the Project Manager role. |
| Default View for Administrators | Set the default view after opening the app for users with the Administrator role. |
| Office Location in User Profile | Useful for organizations with multiple office locations. When enabled, administrators can define office locations under Administration → Office Locations and assign them to users under Administration → Users. Office locations allow setting up location-specific public holidays and filtering user timesheets by location for more accurate reporting and management. . |
| Number of Managers in User Profile | Define the number of managers assigned to users when the manager source is set within the app under Administration → Users. |
| Default Page Size in Data Tables | Set the number of entries displayed per page in all data tables. |
| Link to the Main Site (left menu) | Choose the main site link ('Main Site' in the left menu). Select 'Parent SharePoint Site' to link to the primary SharePoint site (where the app is installed), 'Custom URL' to specify a unique URL, or 'Disabled' to remove the main site link. |
| Custom Main Site URL | When 'Custom URL' is selected for the main site link, specify the custom URL here. |
| Custom User Fields | When enabled, you can add custom fields to the user object (Administration→Users). |
| Custom Project Fields | When enabled, you can add custom fields to the 'Project' objects (Administration → Projects in the left menu). |
| Custom Client Fields | When enabled, you can add custom fields to the 'Client' object (Administration→Clients). |