Admin Guide
Timesheet Templates
Timesheet Templates give administrators the flexibility to design different timesheet structures for various teams. Each template can include its own reporting periods, entry modes, custom fields, workflows, and validation rules, ensuring that the timesheet process aligns with specific departmental or organizational requirements.
Managing Templates
Timesheet Templates let you standardize how timesheets work across your organization.
You can keep a single, global template for everyone or configure
department-specific templates when teams need different periods, entry modes, fields, workflows, or validation rules.
This behavior is controlled by the Timesheet Template Scope setting available under Administration → Settings.
Template Scope: Global vs. Per Department
- Global (One Common Template): Use when all departments share the same configuration (periods, approval flow, fields, constraints).
- Per Department: Use when different departments require different timesheet periods (e.g., weekly vs. monthly), custom fields, or approval paths.
Editing the Default Template
By default, the app includes one template named “Default timesheet template”. This template can be customized to match your business needs. In many cases, when all departments use the same settings, this single template is sufficient.
- Go to Administration → Request Templates.
- Open Default timesheet template.
- Adjust settings (e.g., period, entry mode, constraints, form fields, workflow, email templates).
- Click Save to apply changes.
Note: Changes affect new timesheets created after saving. Existing, in-progress timesheets keep their original settings.
Creating New Templates & Assigning to Departments
If different departments need different configurations, such as unique reporting periods, approval paths, or custom metadata—create multiple templates and assign them to the corresponding departments.
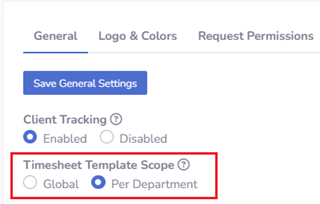
Step 1 — Set Template Scope to “Per Department”
- Navigate to Administration → Settings.
- Find Timesheet Template Scope and select Per Department.
- Click Save General Settings.
Step 2 — Create Department-Specific Templates
- Go to Administration → Request Templates.
- Click Create New and choose Timesheet Template.
- Configure General Settings, Timesheet Constraints, Workflow etc
- Click Save.
Step 3 — Assign Templates to Departments
- Navigate to Administration → Departments.
- Open a department to edit.
- In the Timesheet Template field, select the template you created for this department.
- Click Save. Repeat for each department as needed.
Tip: Use clear, descriptive template names (e.g., “Finance — Monthly (Start/End)” or “Support — Weekly (Daily Columns)”).
General Template Settings
In the General Settings section, administrators define the core behavior of each timesheet template. The key configuration options include the Period Type (Weekly, Bi-Weekly, Semi-Monthly, or Monthly) and the Dates Entering Mode (pre-generated date columns or user-entered dates). Additional features—such as metadata forms, file attachments, or overtime tracking—can be enabled to enhance functionality and ensure the template aligns with specific business or departmental requirements..
List of All General Settings
The following table lists all configuration options available under the General tab of the timesheet template, along with their descriptions.
| Setting Name | Description |
|---|---|
| Template Title | Specify the title for this template. |
| Period Type | Specifies the period type mode. Options: Weekly, Bi-Weekly, Semi-Monthly, Monthly. |
| Dates Entering Mode | Specifies the dates entering mode. Options: Pre-generated Date Columns, Date + Start Time + End Time, Only Date. |
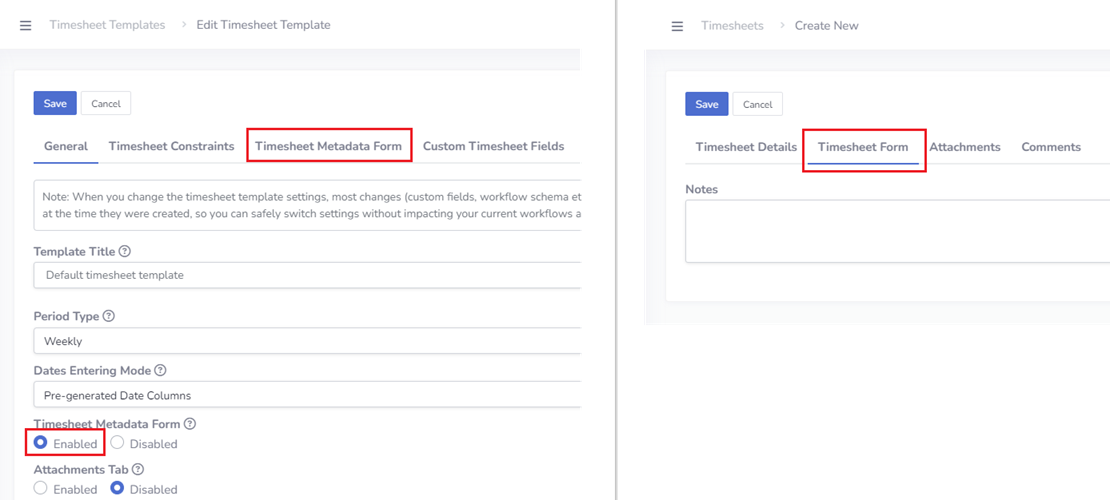
| Timesheet Metadata Form | When enabled, an additional tab Timesheet Form will appear on the timesheet create/edit page. You can design the form schema in the timesheet template settings under the tab Timesheet Metadata Form. |
| Attachments Tab | Choose whether users are allowed to upload attachments to the timesheet. |
| Time-Off Tracking | Enable this option to include time-off entries in timesheets. When disabled, time-off data will not be tracked or displayed. |
| Breaks Tracking | Allow users to record break durations within their timesheets. Disable if breaks should not be tracked separately. |
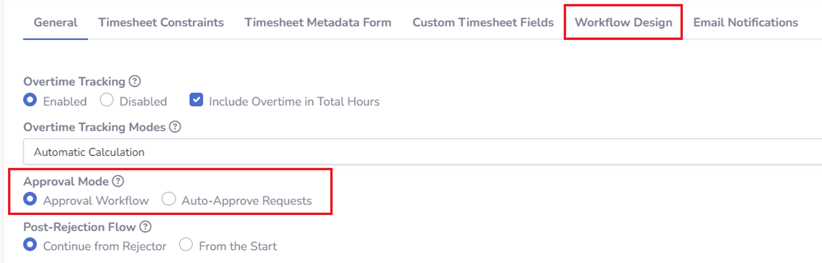
| Overtime Tracking | Turn on this option to track overtime hours. When disabled, overtime will not be recorded or included in totals. |
| Overtime Tracking Modes | Choose how overtime hours are handled — either calculated automatically by the system or entered manually by users. |
| Approval Mode | Select how timesheets should be processed. Choose Approval Workflow to require approvals through the configured path (tab "Workflow Design"), or Auto-Approve Request to automatically approve all timesheet requests without any approval steps. |
| Post-Rejection Flow | Define the workflow steps when a request is rejected. From the Start - After rejection and resubmission, the flow is "reset" and goes back to the first stage. Continue from Rejector - After rejection and resubmission, the request goes back to the user/group who rejected it. |
| Completion Due Date | Enable or disable the setting of a completion due date for timesheets created from this template. When enabled, the app calculates a 'Completion Due Date,' visible under the 'Request Info' tab on the request details page and optionally in data tables. |
Period Type
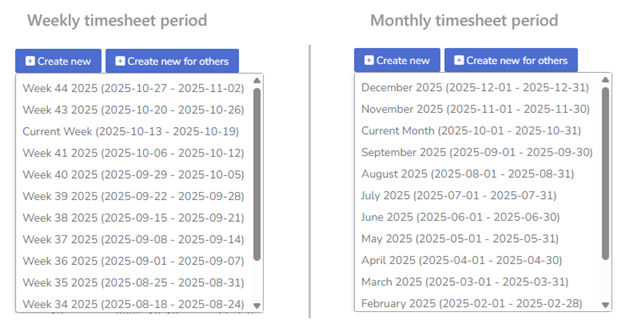
The Period Type setting defines how timesheet periods are structured and displayed in the app. You can choose between Weekly, Bi-Weekly, Semi-Monthly, or Monthly modes.
When creating a new timesheet, users select the reporting period from a drop-down list showing the most recent periods available. The format of this list depends on the selected period type. For example:
- Weekly mode: Week 44 2025, Week 45 2025, Week 46 2025
- Monthly mode: September 2025, October 2025, November 2025
This configuration ensures that timesheets are grouped consistently according to your organization’s reporting cycle.
Dates Entering Mode
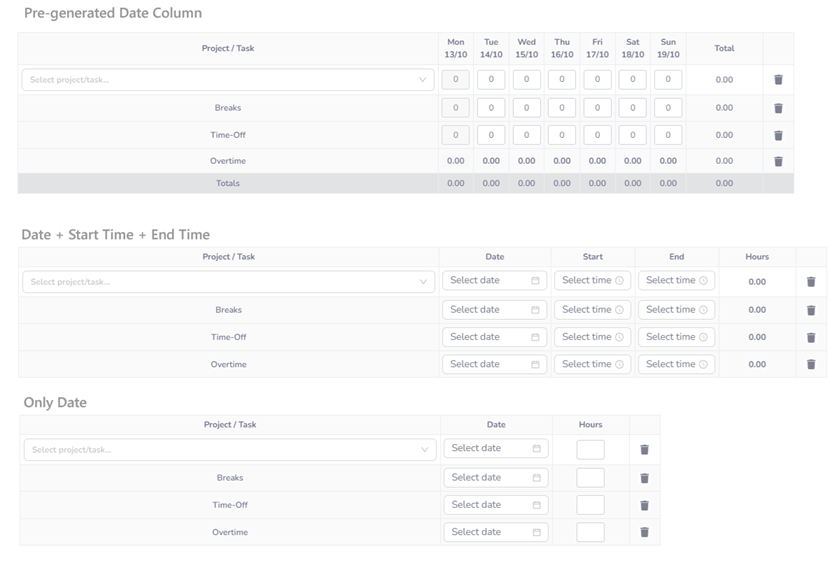
The Dates Entering Mode setting defines how users record working time within the timesheet form. It controls the layout and data entry method for days and hours.
Available options:
- Pre-generated Date Columns: The app automatically generates one column for each day within the selected period. Users can simply enter their worked hours directly under each day (e.g., Monday – 8h, Tuesday – 7.5h).
- Date + Start Time + End Time: Users manually enter the specific date along with task start and end times. The app automatically calculates the total number of worked hours based on the time difference.
- Only Date: Users select only the date of the task or workday, without specifying start or end times. This mode is typically used when tracking daily activities or presence without time details.
Choosing the right dates entering mode ensures that the timesheet layout matches your organization’s preferred way of reporting time.
Additional Time Rows (breaks,time-off, overtime)
Use this section to control extra rows on the timesheet for Time-Off, Breaks, and Overtime.
When a setting is Enabled, a dedicated row appears on the timesheet form. When Disabled, the row is hidden.

Overtime Tracking Modes
If Overtime Tracking is enabled, choose how overtime is captured:
- Automatic Calculation — The app calculates overtime based on your company schedule configured under Administration → Settings → Working Days and Hours.
- Manual Entry — Users enter overtime hours directly in the Overtime row on the timesheet.
Timesheet Constraints
The constraints section helps maintain consistency and prevent errors. Administrators can set rules such as minimum or maximum hours per timesheet, limit the number of hours that can be logged in a single day, or restrict users from creating duplicate entries for the same period. These rules ensure that data remains accurate while supporting compliance with internal policies.
List of All Timesheet Constraints
The following table lists all configuration options available under the Timesheet Constraints tab of the timesheet template, along with their descriptions.
| Setting Name | Description |
|---|---|
| Minimum Hours Per Timesheet | Specifies the minimum number of hours required for a timesheet entry. |
| Maximum Hours Per Timesheet | Specifies the maximum number of hours allowed for a single timesheet entry. |
| Maximum Hours Per Day | Limits the total hours that can be recorded in a single day across all timesheet entries. |
| Prevent Duplicate Timesheets | Enable to prohibit multiple timesheet entries for the same time period and employee. |
| Require Project/Task | Enable to require each timesheet entry to be associated with a valid project or task. |
| Allow Zero-Hour Timesheets | Allows submission of timesheets with zero total hours. |
| Future Periods Creation Limit | Defines how many future periods a user is allowed to create a timesheet for. |
| Past Periods Creation Limit | Defines how many past periods a user is allowed to create a timesheet for. |
Custom Timesheet Fields (optional)
If there is a business need, the app administrator can define Custom Timesheet Fields that will be displayed on the timesheet form (for example, Notes, Cost Center, etc.).
Custom fields are configured under the Custom Timesheet Fields tab in the timesheet template settings.
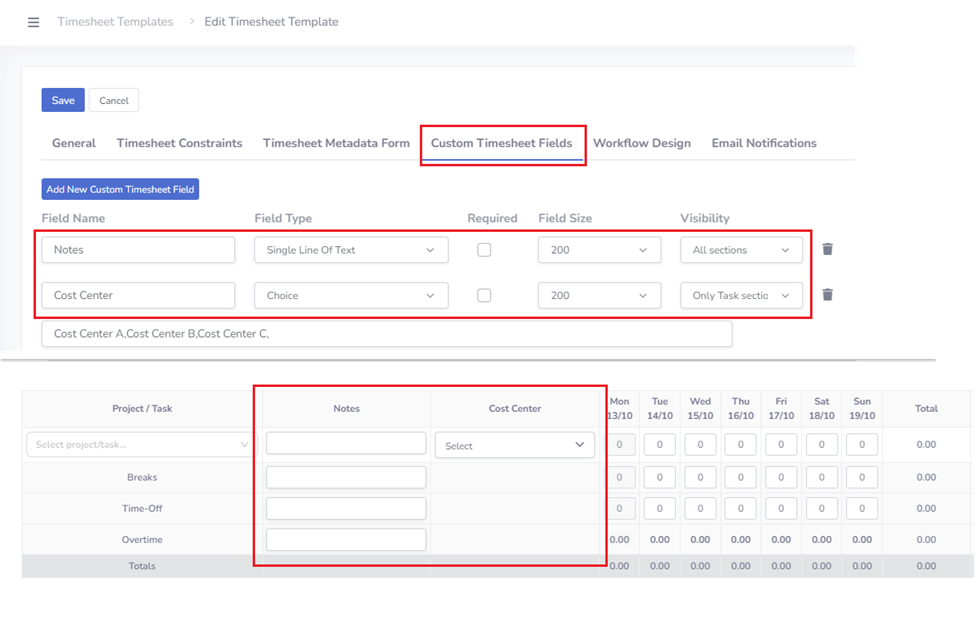
Each custom field includes the following properties:
- Field Name – the header of the column displayed on the timesheet form.
- Field Type – defines the data type of the field (Single Line of Text, Number, Date, Boolean, Choice, Choice from external SharePoint list or Datasource).
- Required – specifies whether the field must be filled in.
- Field Size – defines the width of the field in pixels (e.g., 200px).
- Visibility – determines where the field is visible: All Sections (including breaks, time-off, etc.) or Only Task Selection.
Timesheet Form and Form Designer (optional)
In addition to the main timesheet table, each timesheet can include a dedicated form for capturing additional metadata.
When the Timesheet Metadata Form option is enabled, an extra Timesheet Form tab appears in the timesheet request view. Administrators can design its layout and fields under the Timesheet Metadata Form tab in the timesheet template settings.
Using the built-in Form Builder, administrators can create custom fields to capture any process-specific information. This allows organizations to enrich timesheet requests with tailored data points—such as cost centers, extra notes, or department-specific details—ensuring all relevant information is collected in a structured and consistent manner.
Design Form Layout
In the Timesheet Metadata Form tab, you will find two toolboxes in the left menu: Forms and Layout.
- Forms: Contains elements related to form functionality, such as Text Input, Number Input, Choice etc.
- Layout: Allows you to control the design and structure of the form, affecting both the screen display and the printed form. The layout items include:
- Header Bar: Typically used for titles or descriptions at the top of the form.
- Label: Used for creating labels for form fields.
- Paragraph: Adds text for explanations or additional instructions.
- Line Break: Adds space between items, helping to visually separate sections of the form.
- Two Column Row: Organizes content into two columns for a more balanced form layout.
- Three Column Row: Organizes content into three columns, ideal for forms with multiple fields.
- Image: Allows you to insert images into the form layout, such as logos or other relevant graphics.
Additionally, you can easily rearrange the layout of the form by clicking the move icon next to any item. This allows you to move items to the top or bottom of the form layout to adjust the order as needed.
Using Field Properties
To control the properties of each form item, click on the edit icon next to the item. This allows you to modify various settings, including:
- Read Only: This property allows you to make the field read-only, preventing users from editing the field value.
- Conditional Visibility: This property enables you to set conditions that determine when a form item should be visible. For example, you can show or hide fields based on the value of another field.
- Custom Permission Schema: This feature allows you to define custom permissions for a specific field, ensuring that only certain users or groups can view or edit that field.
- Source: Source of data for choice fields
Once you click the edit icon, a settings panel will open, where you can adjust these properties according to your needs. After making the necessary changes, save your settings to apply the changes to the form.
Workflow Designer Guide
Timesheets can be either automatically approved or submitted for approval through a defined approval path.
This behavior is controlled by the Approval Mode setting, which offers two options:
Approval Workflow and Auto-Approve Requests.
When Approval Workflow mode is selected, app administrators can configure detailed approval paths under the Workflow Design tab.
Design The Workflow Path
As an app administrator, you have the flexibility to design workflows using different flow types:
- Sequential Stage: In sequential stages, each approval is processed one by one. The next stage in the workflow waits until the previous stage is completed. This is useful when approvals need to be completed in a specific order.
- Parallel Stage: In parallel stages, approvals are processed simultaneously, allowing multiple actions to occur at the same time. This can help speed up the workflow when approvals do not depend on one another.
- Combination of Sequential and Parallel Stages: You can also design workflows with a combination of sequential and parallel stages, providing even more flexibility for complex approval paths.
This flexibility ensures that you can design workflows that match the unique approval requirements of your organization, managing the process efficiently and effectively.
Flow Item Assigment
The app administrator can configure the assignment of each flow item by selecting the item and choosing the Assign Stage To option. This allows the administrator to define the assignment rule for the flow stage.
The Assign Stage To field offers the following options:
- Requester Self-selection on the Create Form: The requester selects the assigned user directly on the request form (a separate tab called 'Flow Assigments'). This option provides flexibility, allowing the requester to determine who will be responsible for the approval.
- Requester's Manager from M365 User Profile: The assignee (manager) is automatically taken from the requester's Microsoft 365 User Profile.
- Requester's 1st/2nd/3rd/4th Line Manager from User Profile: The assignee (manager) is automatically selected from the user’s profile in the app (under Administration > Users). This allows for more specific hierarchical assignments, depending on the level of manager needed.
- Selected Group: The item is assigned to a specific group, allowing for a team or department to handle the approval.
- Project Manager(s): The item is automatically assigned to the Project Manager(s) of the projects selected by the user in the specific timesheet form (as defined under Administration → Projects). For example, if a user reports tasks for two different projects managed by two different project managers, both managers will be included in the approval path. .
- Selected User: The item is assigned to a specific user, providing a direct assignment to an individual.
- Requester: The item is assigned to the requester themselves, meaning the person who initiated the request will handle the approval.
By selecting the appropriate assignment rule, the administrator can ensure that each stage in the workflow is assigned to the right person or group, streamlining the approval process.
Email Notifications Templates
If the Timesheet Approval option is enabled, you can configure dedicated email templates for specific actions under the Email Templates tab. Here, you can customize the email subject and body (for example, by adding variables) or include additional CC recipients.
To activate email notifications, you need to create a Power Automate flow, as explained on the referenced documentation page.