Admin Guide
Installation
This section provides step-by-step instructions for installing and integrating the app within your Microsoft 365 environment. It covers downloading the app from the SharePoint Store (which adds it to the Tenant App Catalog), installing the app in SharePoint or Microsoft Teams, and if you plan to use the app in both SharePoint and Microsoft Teams, explains how to configure it.
Installation from the SharePoint Store
To install the app (free trial version) from the SharePoint Store, follow the steps below
- Open below link (Product Site in Microsoft App Source)
Product Site in Microsoft App Source - Cick on the button "Get It Now"
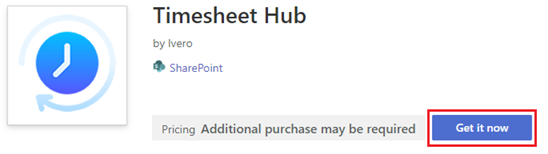
- You will be redirected to the product page in the SharePoint Store.
Click button "Add to Apps Site"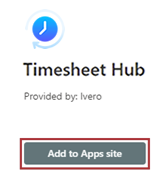
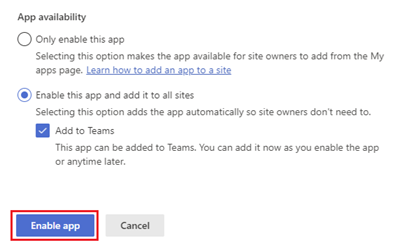
- Select deployment mode and click button "Add"
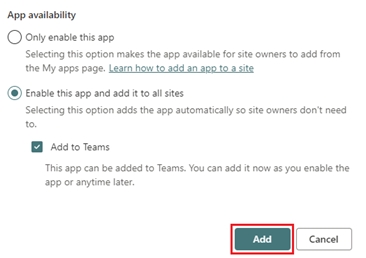
SharePoint Framework (SPFx) apps have the following deployment options:
• Only enable this app – enable the app but does not add it to any site. Use this if you want to control which sites will have the app as an option to install. If you select this option, the app must be manually installed on each specific site where it will be used. Detailed instructions are available at this link
• Enable this app and add it to all sites – makes the app available across all SharePoint sites. Site admins still need to manually add the app to a page.
Add to Teams (optional) - checking this option also makes the app available in Microsoft Teams, so users can access it directly from Teams.
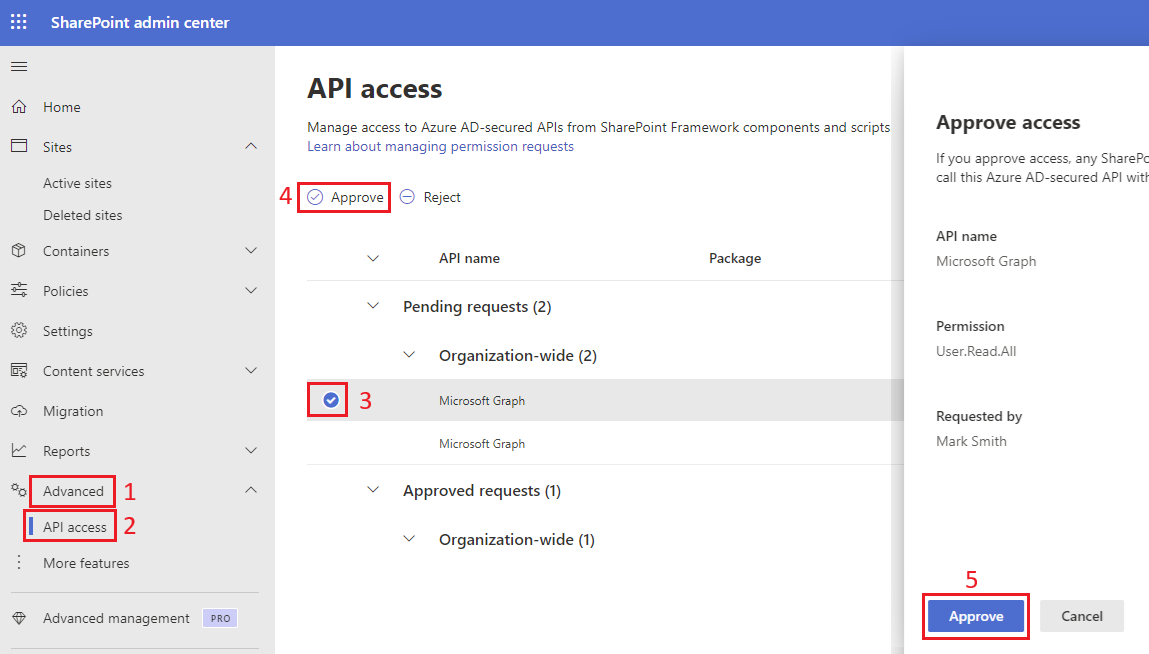
- Open SharePoint Admin Center, for example by using this link , and sign in with an account that has admin permissions for your organization.
- Go to Advanced → API Access in the left menu and verify all three API requests.
SharePoint and MS Teams Deployment Options
This SPFx application can be used in both SharePoint and Microsoft Teams. The deployment method depends on your primary working environment.
SharePoint-centric deployment
If your primary environment is SharePoint, install the app and add the app web part to a SharePoint page, as described in the section Adding the App to a SharePoint Page.Optionally, you can add this SharePoint page as a tab in Microsoft Teams to make the app accessible within Teams, which is explained in section Add the App Web Part as a Tab in a Teams Channel.
Microsoft Teams-centric deployment
If your primary environment is Microsoft Teams and the app must be visible in the Teams left navigation menu (sidebar), the installation order is important. In this case, the app must first be installed in Microsoft Teams, as described in the section Add the App to the Microsoft Teams Left Menu Afterward, you can also add the app web part to a SharePoint page, as described in the section Using a Microsoft Teams app instance in SharePointAdding the App to a SharePoint Page
Follow the below steps to add the App to a SharePoint Page
- Navigate to the SharePoint site where you want to install the app.
- Click the 'Home' button from the top or left SharePoint menu, then choose '+ New' and select 'Page' from the dropdown.

- From the 'Full-page apps' section, select 'Timesheet Hub,' then click on it and press the 'Use this template' button.
Notice: Although the app can technically be added to any web part section, we strongly recommend installing it from 'Full-page apps' by following the instructions below. This ensures the best user experience and helps prevent issues that may occur when other web parts are loaded on the same page.
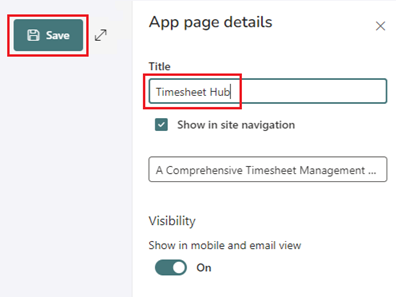
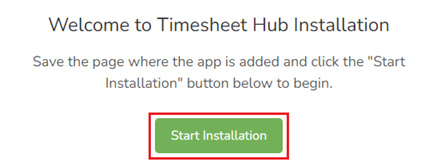
- Enter a title for the page (e.g., Timesheet Hub) and click Save.
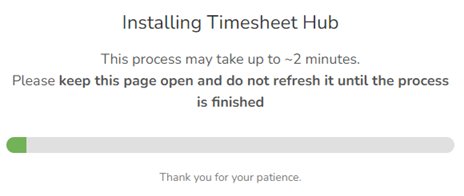
- Click Start Installation and wait for up to 2 minutes for the process to complete.
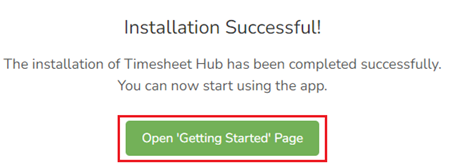
- Once the installation is successful, click Open Getting Started Page to launch the app.
Adding the App to MS Teams
There are two supported deployment options, depending on how you want the app to appear in Microsoft Teams.
Option 1: Add the App to the Microsoft Teams Left Menu
If the requirement is for the app to be visible in the Microsoft Teams left navigation menu (sidebar), the installation order is important. In this scenario, the app must be installed in Microsoft Teams first .Please follow the steps below to add the app to the Microsoft Teams left navigation menu
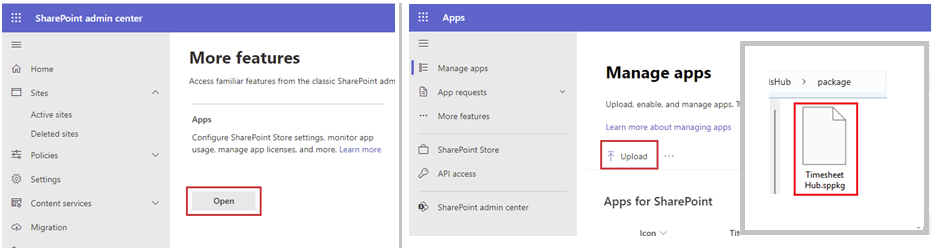
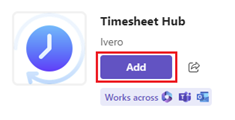
- When the app is installed in your SharePoint tenant, it should appear on the 'Apps' page under the 'Built for your org' section. Click the 'Add' button to add the app.

- Confirm the installation by clicking 'Add' on the confirmation popup.
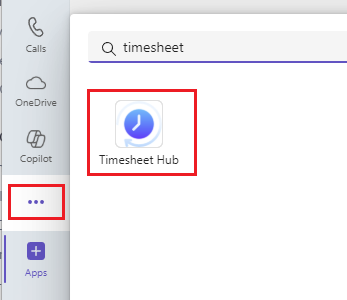
- Once installed, the app should be accessible by clicking the three dots ('View more apps')."
- Each Microsoft Teams team has an associated SharePoint site (known as the SharePoint team site).
If the app is not installed on the SharePoint site, you will see an installation prompt.
In such a case, you must click the "Start Installation" button and wait for up to 2 minutes for the process to complete.
For detailed, step-by-step instructions on how to open a Microsoft Teams app instance in SharePoint, see: Using a Microsoft Teams app instance in SharePoint
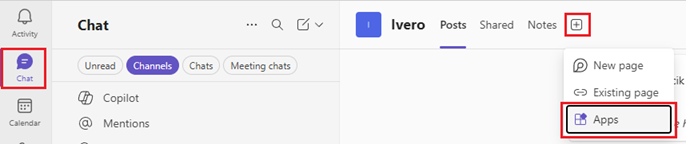
Option 2: Add the App Web Part as a Tab in a Teams Channel
If you only need to display the app inside a Teams channel (as a tab), you can install the SharePoint app first (section 'Adding the App to a SharePoint Page') and then add it as a tab in Teams. In this scenario, installing the Microsoft Teams app is not required.Please follow the steps below to add webpart as tab in Teams Channel
- Open the Microsoft Teams client.
- Navigate to the desired team and channel.
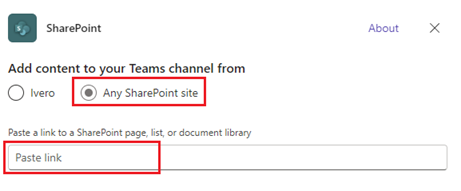
- Click the "+" (Add tab) icon and select "Apps".
- In the search box, type "SharePoint" and select the SharePoint app.
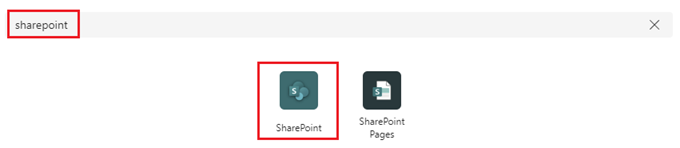
- Switch the option to "A SharePoint site", then paste the URL of the app web part that has already been added in SharePoint.