Automatic Microsoft 365 SSO
Microsoft 365 Single sign-on (SSO) offers robust security features to protect your data, including encryption or multi-factor authentication.

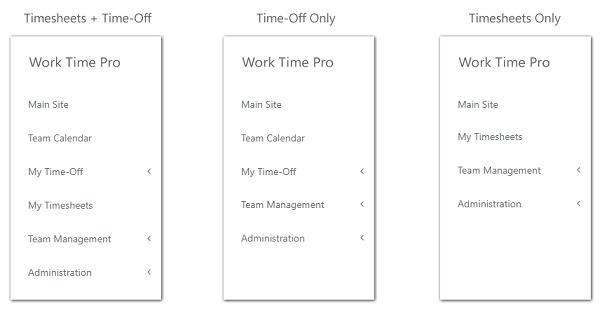
The app handles both timesheet and time-off requests, but you don't need to use all the modules.
The app can work in one of three work modes:


After successful installation, the app is located on the SharePoint Site Contents.
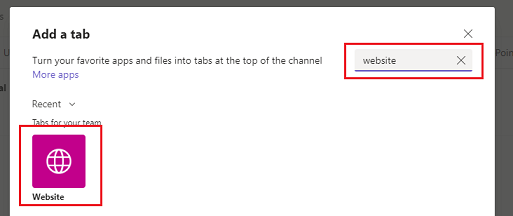
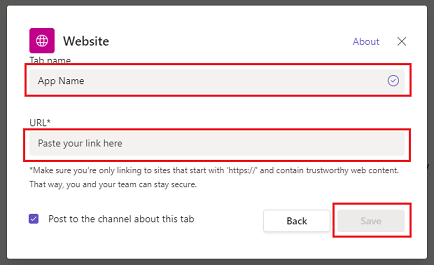
First, enter the app (first page) and copy the full URL from the browser's address bar into the clipboard (Ctlr+C).
The copied app URL will be useful in the following instructions.
App is 100% SharePoint-hosted - all data is stored securely on the customer's SharePoint environment.
App's data is never leaving your SharePoint env, we don't have access to your data and we never see it.
Please use instructions from this guide to install the app via app installation package (SFPx) and SharePoint App Catalog.
Yes, you can download Regular User's Guide, Manager's Guide and Admin's Guide
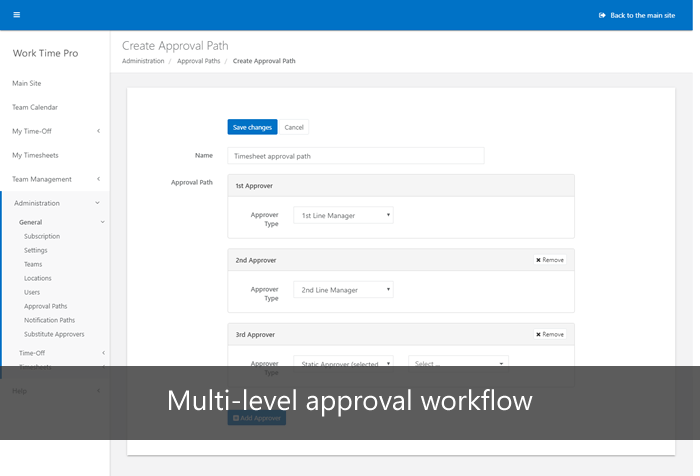
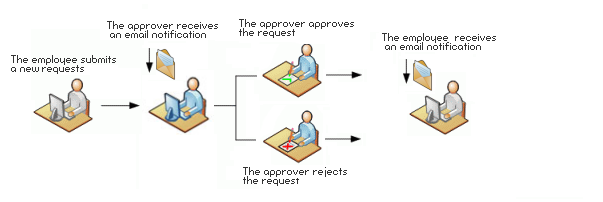
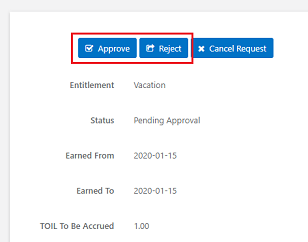
Approval workflow routes a timesheet or time-off request to one or more people for their approval or rejection.
Multi-level approval paths for timesheet and time-off type can be configured under Administration->General->Settings->Approval Paths .
Timesheet workflow consists of the following states: Draft->Pending Approval->Approved or Rejected.
Time-off workflow consists of the following states: Pending Approval->Approved or Rejected (+ option "Canceled")
The approver(s) receives an email notification when a request is submitted.
The requester receives an email notification when a request is approved or rejected.
App offers three predefined user roles:
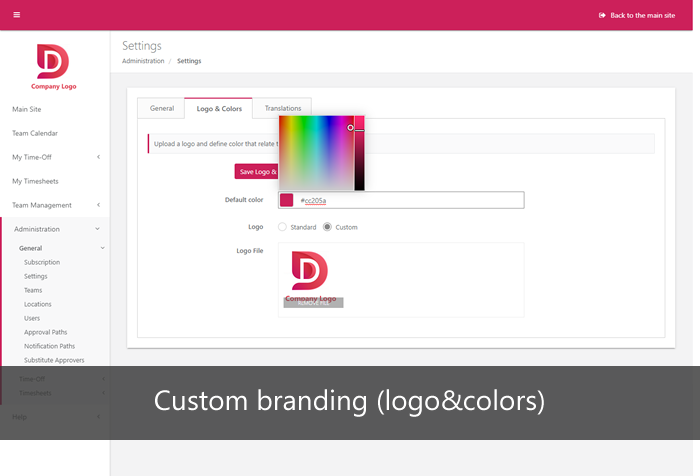
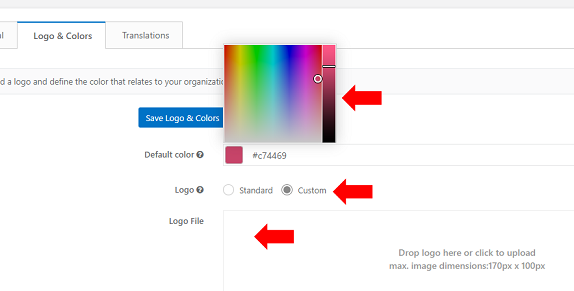
You can custom brand your logo and color under Administration->General->Settings->tab "Logo&Colors".
To upload own logo you need to:
a) switch setting "Logo" to the value "Custom"
b) click on area "Logo File" (or use drag&drop) to upload logo file.
c) click on button "Save Logo&Colors"
To change blue theme to another you need to click on color picker (setting "Default color"), select your color and click on the button "Save Logo&Colors".
You can translate an app under Administration->General->Settings->tab "Translations".

Language translation is available for regular user and manager views (except section "Administration").
To get more information about subscription and payments please read Billing & Payments FAQ
If you remove a user from the app, no data will be lost. The user will lose access to app, but their data will remain visible on all reports.
App update process is described here and also on our Technical FAQ, question "How to update SharePoint app?"
User list is pulled from SharePoint User Information List (built-in SharePoint feature, here is more info)
SharePoint user is added to the User Information List after first login to the SharePoint Site.
After first login, user will be visible in the user's drop-down list.
Import from MS Excel is supported for the following objects:
• Teams
• Locations
• Users
• Public Holidays
• Entitlements
• Time-Off Requests
• Projects
To import data, click "Create" and select "Bulk Import"

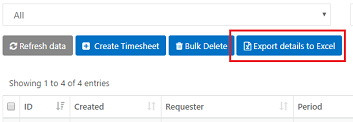
Table export is supported for all the objects in the app (columns displayed in data tables). To export or print data, click the proper button in the top-right corner, above the data table.
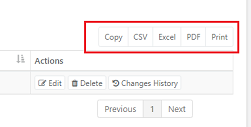
Additionally, objects with supported custom fields (time-off requests, timesheets and projects) allow full data export to MS Excel (all standard fields + custom fields.)
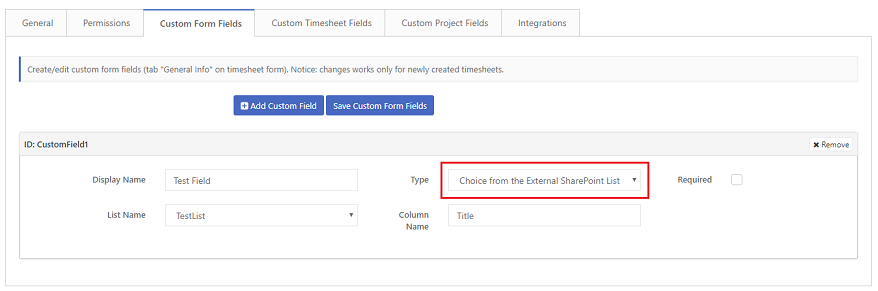
The app allows for creating custom fields for timesheet and time-off requests. One of the custom field types is "Choice from External SharePoint List" which allows to dynamically populate the Choice Field options from the external SharePoint list on the parent SharePoint Site.
To configure this type of field, you need to change the "Type" field to the value "Choice from External SharePoint List", afterward select list name from the drop-down and enter column name from which app will get data.
You can configure monthly auto accruals by creating new entitlement policy under Administration->Time-Off->Entitlement Policies
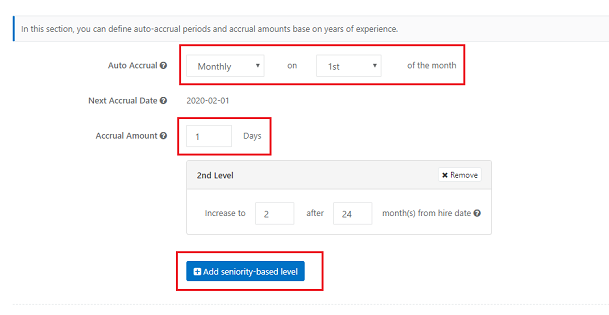
Setting "Auto Accrual" allows to select auto accrual mode:
1.Yearly - balance automatically increased once a year
2.Monthly - balance automatically increased once a month
3.Hire Date - balance automatically increased once a year at employee hire date (defined under Administration->General->Users)
4.Disabled - auto-accrual disabled, balance can be manually controlled by app admin
Button "Add seniority-based level" allows defining the different amount of accrual, based on seniority level (calculated by using the field"Hire Date" defined in the user profile).
Created entitlement policy must be assigned to entitlement under Administration->Time-Off->Entitlements.
TOIL (Time-Off in Lieu) or Compensatory Time is paid time off given to an employee instead of overtime pay. Below are steps to use this feature:
Step 1) As app administrator, go to the Administration->Time-Off->Settings, set up "TOIL" to "Enabled" and click Save.
TOIL requires to select approval path (which might be configured under Administration->General->Approval Paths)
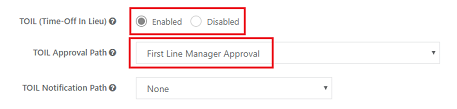
Optionally, administrator can configure email templates under Administration->Time-Off->TOIL Email Templates.
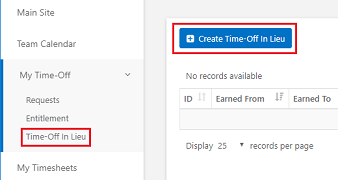
Step 2) A regular user can submit TOIL request under My Time-Off->Time-Off In Lieu
Step 3) Approver(s) defined in the TOIL approval path receives an email notification, the request can be approved or rejected
Step 4) After approval, requested TOIL amount increases available balance, total TOIL amount is stored on the separate column

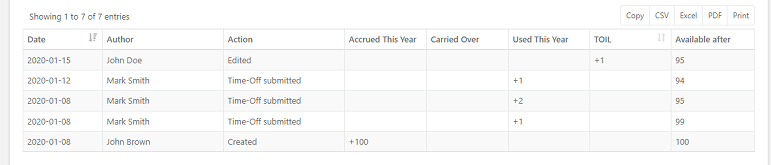
You can check changes history of entitlement under Administration->Time-Off->Entitlements by click on button "Action".
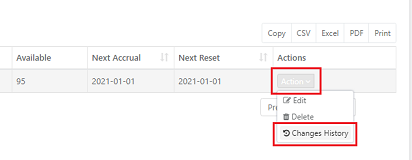
Entitlement history allows tracking all changes(time-off deduction,auto-accruals, manual edit, carry-over, reset, etc)
You can check changes history of entitlement under Administration->Time-Off->Entitlements by click on button "Action".
Entitlement history allows tracking all changes(time-off deduction,auto-accruals, manual edit, carry-over, reset, etc)
You can add custom field under Administration->Time-Off->Time-Off Types->Edit->tab "Custom fields".

You need to enter the field name, field type (single line of text, user, date, etc.) and optionally set up field as required.
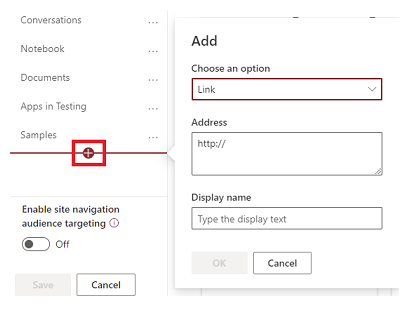
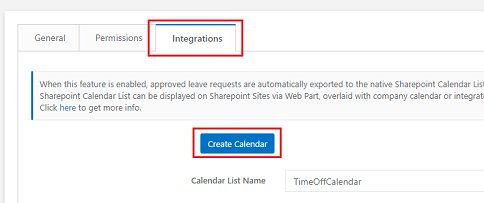
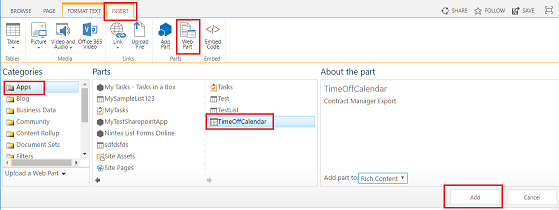
Step 1) As app administrator, go to the Administration->Time-Off->Settings->tab "Integrations" and create integration list
Step 2) Go to the SharePoint Site, click "Edit" in the top-right corner (you need to have required
permissions to see edit option), select calendar list and click "Add"

Step 3) Click Insert=>Web Part=>Apps, select calendar and then click "Add" to add webpart.
Optionally: Filter calendar entries (i.e. display entries only from particular department or time-off type)
a) Click on Web Part Properties and "Edit current view"
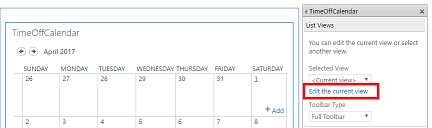
b) On the "Filter" section select filter conditions and click "OK" to save.

Notices:
• calendar list is added to the parent SharePoint Site (where the app is installed), so calendar can be displayed as web part only on the parent SharePoint Site
• export works only for newly approved leave requests (doesn't work backward), so after creation calendar list is blank.
Flextime is a flexible hours schedule that allows workers to alter workday start and finish times.
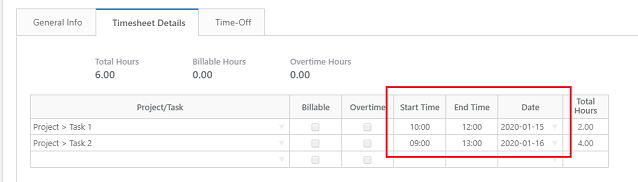
You can enable tracking start/end times by setting up "Dates Entering Mode" to the value "Start Time + End Time + Date Column" under Administration->Timesheets->Settings
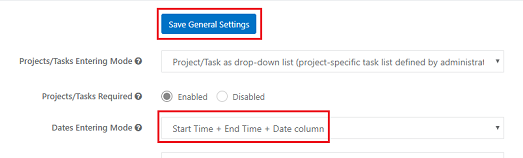
After saving changes, users will see "Start Time" and "End Time" columns on timesheet form. Column "Total Hours" will be calculated automatically, based on hours difference.
You can enable integration features in the app and use Power Automate to integrate with 3rd party systems.
Let say that you would like to export total working hours and billing amount to the external system (i.e. MS Teams,Oracle,SQL Server etc) when the request has been approved:
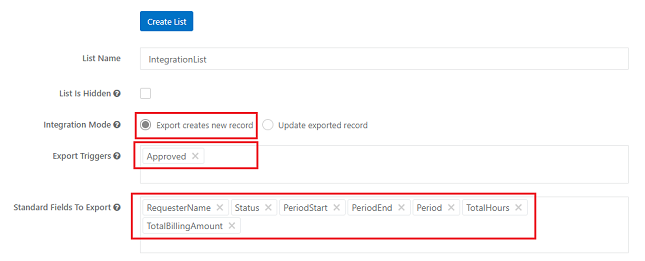
First, go to Administration->Timesheets->Settings->tab "Integrations" and create integration list. Select "Approved" as an export trigger and proper standard fields to export
Afterward, you can use Power Automate trigger "Sharepoint - when an item is created" to call any kind of connector/action.
Here is a list of example integrations.
Custom fields are supported for form fields (tab "General Info" on form), timesheet fields (tab "Timesheet Details" on form) and projects (Administration->Timesheets->Projects).
To create custom field, navigate to Administation->Timesheets->Settings and select proper tab.
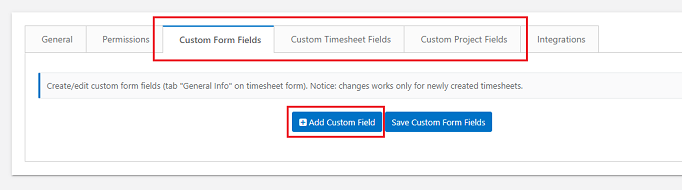
To add custom field click on the button "Add Custom Fields". After modifications click the "Save" button to save changes.
Custom fields are applied only to newly created timesheets and projects.
To avoid data loss in case of field removal, changes in custom fields don't affect existing timesheets and projects.
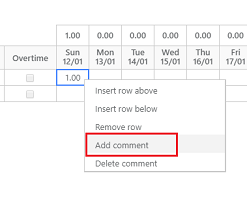
First, please make sure that comments are enabled on timesheet settings (Administration->Timesheets->Settings)
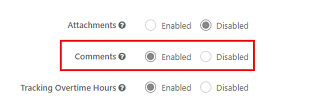
To add a comment to the cell, click the right mouse button on the cell, then select "Add comment" from the context menu